TradingView cannot send orders to brokers natively for most platforms. Connecting requires a webhook relay: generate an API key on your relay platform, paste the webhook URL into a TradingView alert, and configure a JSON payload with action, symbol, and quantity. Ontology Trading adds VWAP/TWAP execution algorithms and multi-broker routing on top of the standard webhook pipeline.
How to Connect TradingView to Your Broker for Automated Execution (2026)
TradingView generates the signals. Your broker holds the capital. The missing piece is the connection between them—a relay that receives TradingView’s webhook alerts and converts them into live orders on your brokerage account. This guide walks through the full setup process, from API key generation to your first live fill, using OntologyTrader as the relay platform. The architectural concepts apply to any webhook-based automation setup, but the specific steps, JSON schema, and execution algorithm options are unique to Ontology’s infrastructure.If you already understand how TradingView webhooks work and just want the setup steps, skip directly to Step 1: Generate Your API Key.
Quick Reference: What You Need Before Starting
| Requirement |
Details |
Why It Matters |
| TradingView subscription |
Pro, Pro+, or Premium ($14.95+/month) |
Webhook alerts are not available on the free plan |
| OntologyTrader account |
app.ontologytrading.com |
Generates your API key and hosts execution algorithms |
| Broker account |
Interactive Brokers, Alpaca, Kraken, Coinbase, Webull, tastytrade, or Sterling |
Where orders are actually filled against live markets |
| A Pine Script strategy or alert condition |
Any strategy that generates entry/exit signals |
Provides the trading logic that triggers webhooks |
| TradingView 2FA enabled |
Required by TradingView for webhook functionality |
Webhooks will not fire without two-factor authentication active on your account |
Total setup time: 15–30 minutes from a blank OntologyTrader account to a live, monitored signal connection. The first five minutes are API key generation and webhook configuration; the remaining time is spent configuring your execution algorithm and running a test signal.
How the TradingView-to-Broker Pipeline Actually Works
Every TradingView automation setup—regardless of which relay platform you use—follows the same three-stage architecture. Understanding this pipeline helps you diagnose problems when signals don’t fire or orders don’t fill.
Stage 1: Signal generation. Your Pine Script strategy evaluates conditions on each bar. When a condition is met (e.g., RSI crosses below 30, MACD histogram flips positive), the alert() function or a strategy order triggers a TradingView alert. This alert fires an HTTP POST request—the webhook—to whatever URL you configured.
Stage 2: Signal relay and validation. The relay platform (OntologyTrader, in this case) receives the HTTP POST at its webhook endpoint. It validates the API key, parses the JSON payload, matches the strategyId to a configured algorithm, and determines the order parameters. This is where OntologyTrader diverges from simpler relay services: instead of forwarding a basic market order, it can route the signal through a VWAP, TWAP, or limit execution algorithm with risk parameter checks.
Stage 3: Broker execution. The relay platform sends the order to your broker’s API. The broker fills it against the live order book and returns a confirmation. OntologyTrader logs every step—signal receipt, algorithm match, order submission, fill confirmation—in its Signal Log and Orders dashboard.
Step 1: Generate Your OntologyTrader API Key
The API key is a shared secret between TradingView and OntologyTrader. Every webhook payload includes this key so OntologyTrader can verify the signal came from your TradingView account—not from someone else hitting the public endpoint.
- Log into OntologyTrader at app.ontologytrading.com.
- Click Settings in the main navigation menu.
- Open Integrations in the left sidebar, then click Signal Connections.
- You will see a TradingView card showing your connection status. If this is your first setup, it displays “Not Configured” in a yellow badge.
- Click Generate Key. Your new API key appears immediately—a cryptographically secure random string (e.g.,
a7b3c9d2e4f1a8b5c6d3e9f2a1b8c4d7).
Security note: Treat this key like a password. Anyone with your API key can send trading signals to your account. Do not commit it to public GitHub repositories, share it in Discord channels, or include it in screenshots. If you suspect your key has been compromised, regenerate it immediately from the same Settings page—the old key is invalidated the moment a new one is created.
Step 2: Copy the Webhook URL
On the same Signal Connections page, OntologyTrader displays your webhook endpoint:
https://signals.ontologytrading.com/api/tradingview/webhook
Click the Copy button next to the URL field. This is the URL you will paste into TradingView’s alert configuration in the next step. Unlike some platforms that assign unique per-user URLs, OntologyTrader uses a single endpoint and authenticates via the API key inside the JSON payload—a cleaner architecture that works identically across all alert types.
Step 4: Build Your Execution Algorithm in OntologyTrader
This is where OntologyTrader diverges significantly from simpler relay services. Instead of blindly forwarding a market order, you configure an execution algorithm that defines how the order is placed, what risk limits apply, and which broker receives it.
- Go to the Algorithms page in OntologyTrader.
- Click New Algorithm.
- Fill in the basic configuration:
| Field |
Example Value |
Purpose |
| Name |
“AAPL RSI Strategy” |
Human-readable label for your dashboard |
| Broker |
Interactive Brokers |
Which connected broker account receives the orders |
| Symbol |
AAPL |
Default trading instrument (can be overridden dynamically) |
| Side |
Buy |
Default order direction (can be overridden dynamically) |
| Quantity |
100 |
Default position size (can be overridden dynamically) |
Link the TradingView Signal
Under Entry Signal configuration:
- Entry Signal Provider: Select “TradingView” from the dropdown.
- Entry Signal ID: Enter the exact
strategyId you used in your TradingView alert message (e.g., my_strategy_1). This string is case-sensitive—if the IDs don’t match character-for-character, OntologyTrader will log the signal as “received but no algorithm matched.”
Enable Dynamic Fields (Optional but Powerful)
OntologyTrader lets you override algorithm defaults with values from the TradingView alert payload. This is where the platform’s flexibility shines for multi-asset and adaptive strategies:
| Dynamic Field |
What It Does |
Use Case |
| Dynamic Symbol |
Algorithm trades whatever symbol the TradingView alert specifies |
One algorithm scans and trades across a watchlist of 50+ tickers |
| Dynamic Action |
TradingView controls whether the order is BUY or SELL |
A single algorithm handles both long entries and short entries |
| Dynamic Quantity |
TradingView’s qty field sets position size per signal |
Pine Script calculates size based on ATR, account equity, or risk percentage |
Example: A single algorithm with all three dynamic fields enabled can receive {"symbol": "AAPL", "action": "BUY", "qty": 50} on one signal and {"symbol": "TSLA", "action": "SELL", "qty": 25} on the next—both routed through the same execution algorithm, same broker, same risk controls.
Choose an Execution Blueprint
This is the capability that separates OntologyTrader from simple webhook-to-market-order relay services. Instead of firing a raw market order the moment a signal arrives, you can specify how the order is executed:
| Blueprint |
How It Works |
Best For |
| Market |
Immediate execution at current best price |
Small orders on liquid instruments where speed matters more than price improvement |
| VWAP |
Breaks the order into slices weighted by historical volume profile, executing more during high-volume periods |
Larger orders (500+ shares) where minimizing market impact is worth a slower fill |
| TWAP |
Distributes the order evenly over a time window regardless of volume |
Illiquid instruments or markets where the volume profile is unpredictable |
| Limit |
Places the order at your specified price or better—does not fill if price moves away |
Price-sensitive entries where you’d rather miss the trade than get a bad fill |
Most retail TradingView automation platforms only offer market orders. VWAP and TWAP execution is typically available only through institutional order management systems (OMS) or prime broker desks. OntologyTrader makes these algorithms accessible to individual algo traders and small funds through the same webhook pipeline.
Set Risk Parameters
- Max Position: The maximum total position size this algorithm can accumulate. If signals keep firing, the algorithm stops adding once this limit is reached.
- Validity: How long the algorithm remains active—Day (auto-stops at market close), GTC (good till cancelled), or a custom time window.
Click Save & Start. Your algorithm is now live and listening for incoming TradingView signals.
Step 5: Test the Full Pipeline Before Going Live
Never skip this step. A single typo in the strategyId or API key means signals arrive at OntologyTrader but silently fail to match any algorithm. Testing catches these issues before real capital is at risk.
- In OntologyTrader, go to Settings > Signal Connections and scroll to the Test Command section.
- Click Copy to copy the pre-built PowerShell test command.
- Open PowerShell (or Terminal on Mac/Linux) and paste the command.
- You should see
HTTP 200 OK in response.
An HTTP 200 confirms three things: the webhook endpoint is reachable, your API key is valid, and the signal service is running. If you get a 401 (unauthorized), your API key is wrong. If you get a timeout, check your network or firewall settings.
Verify in the Signal Log: Navigate to Monitors > System Monitor > Signal Log tab. Your test signal should appear in real-time, showing the raw payload, the matched algorithm (or “no match” if the strategyId is wrong), and a timestamp. This log is your primary debugging tool for the life of the integration.
Step 6: Monitor Live Signals and Execution in Real Time
Once the integration is live, OntologyTrader provides three monitoring surfaces—each answering a different operational question:
| Dashboard |
Where to Find It |
What It Answers |
| Signal Log |
Monitors > System Monitor > Signal Log |
“Did TradingView actually send a signal? Did it match an algorithm?” |
| Orders & Executions |
Orders page (main nav) |
“Was the order placed? Did it fill? At what price? What was the slippage?” |
| Positions |
Positions page (main nav) |
“What is my current exposure? What is the real-time P&L?” |
The Signal Log is the most useful for debugging. If a TradingView alert fires but no order appears, the Signal Log tells you whether OntologyTrader received the webhook at all, and if so, whether the strategyId matched a running algorithm. Most “my automation isn’t working” issues resolve in under two minutes by checking this log.
Advanced Patterns: Multi-Strategy, Multi-Symbol, and Volatility-Based Sizing
Running Multiple Strategies on the Same Symbol
Create separate algorithms for each strategy, each with a unique Entry Signal ID:
TradingView Alert strategyId |
OntologyTrader Algorithm |
Logic |
aapl_rsi |
AAPL RSI Oversold |
Buys when RSI drops below 30 |
aapl_macd |
AAPL MACD Crossover |
Buys on bullish MACD histogram flip |
aapl_breakout |
AAPL Breakout |
Buys on 52-week high breakout with volume confirmation |
Each TradingView alert sends its unique strategyId, and OntologyTrader routes it to the correct algorithm. The algorithms can use different execution blueprints (e.g., Market for the breakout strategy where speed matters, VWAP for the RSI strategy where you’re buying a dip and want price improvement).
One Algorithm, Many Symbols
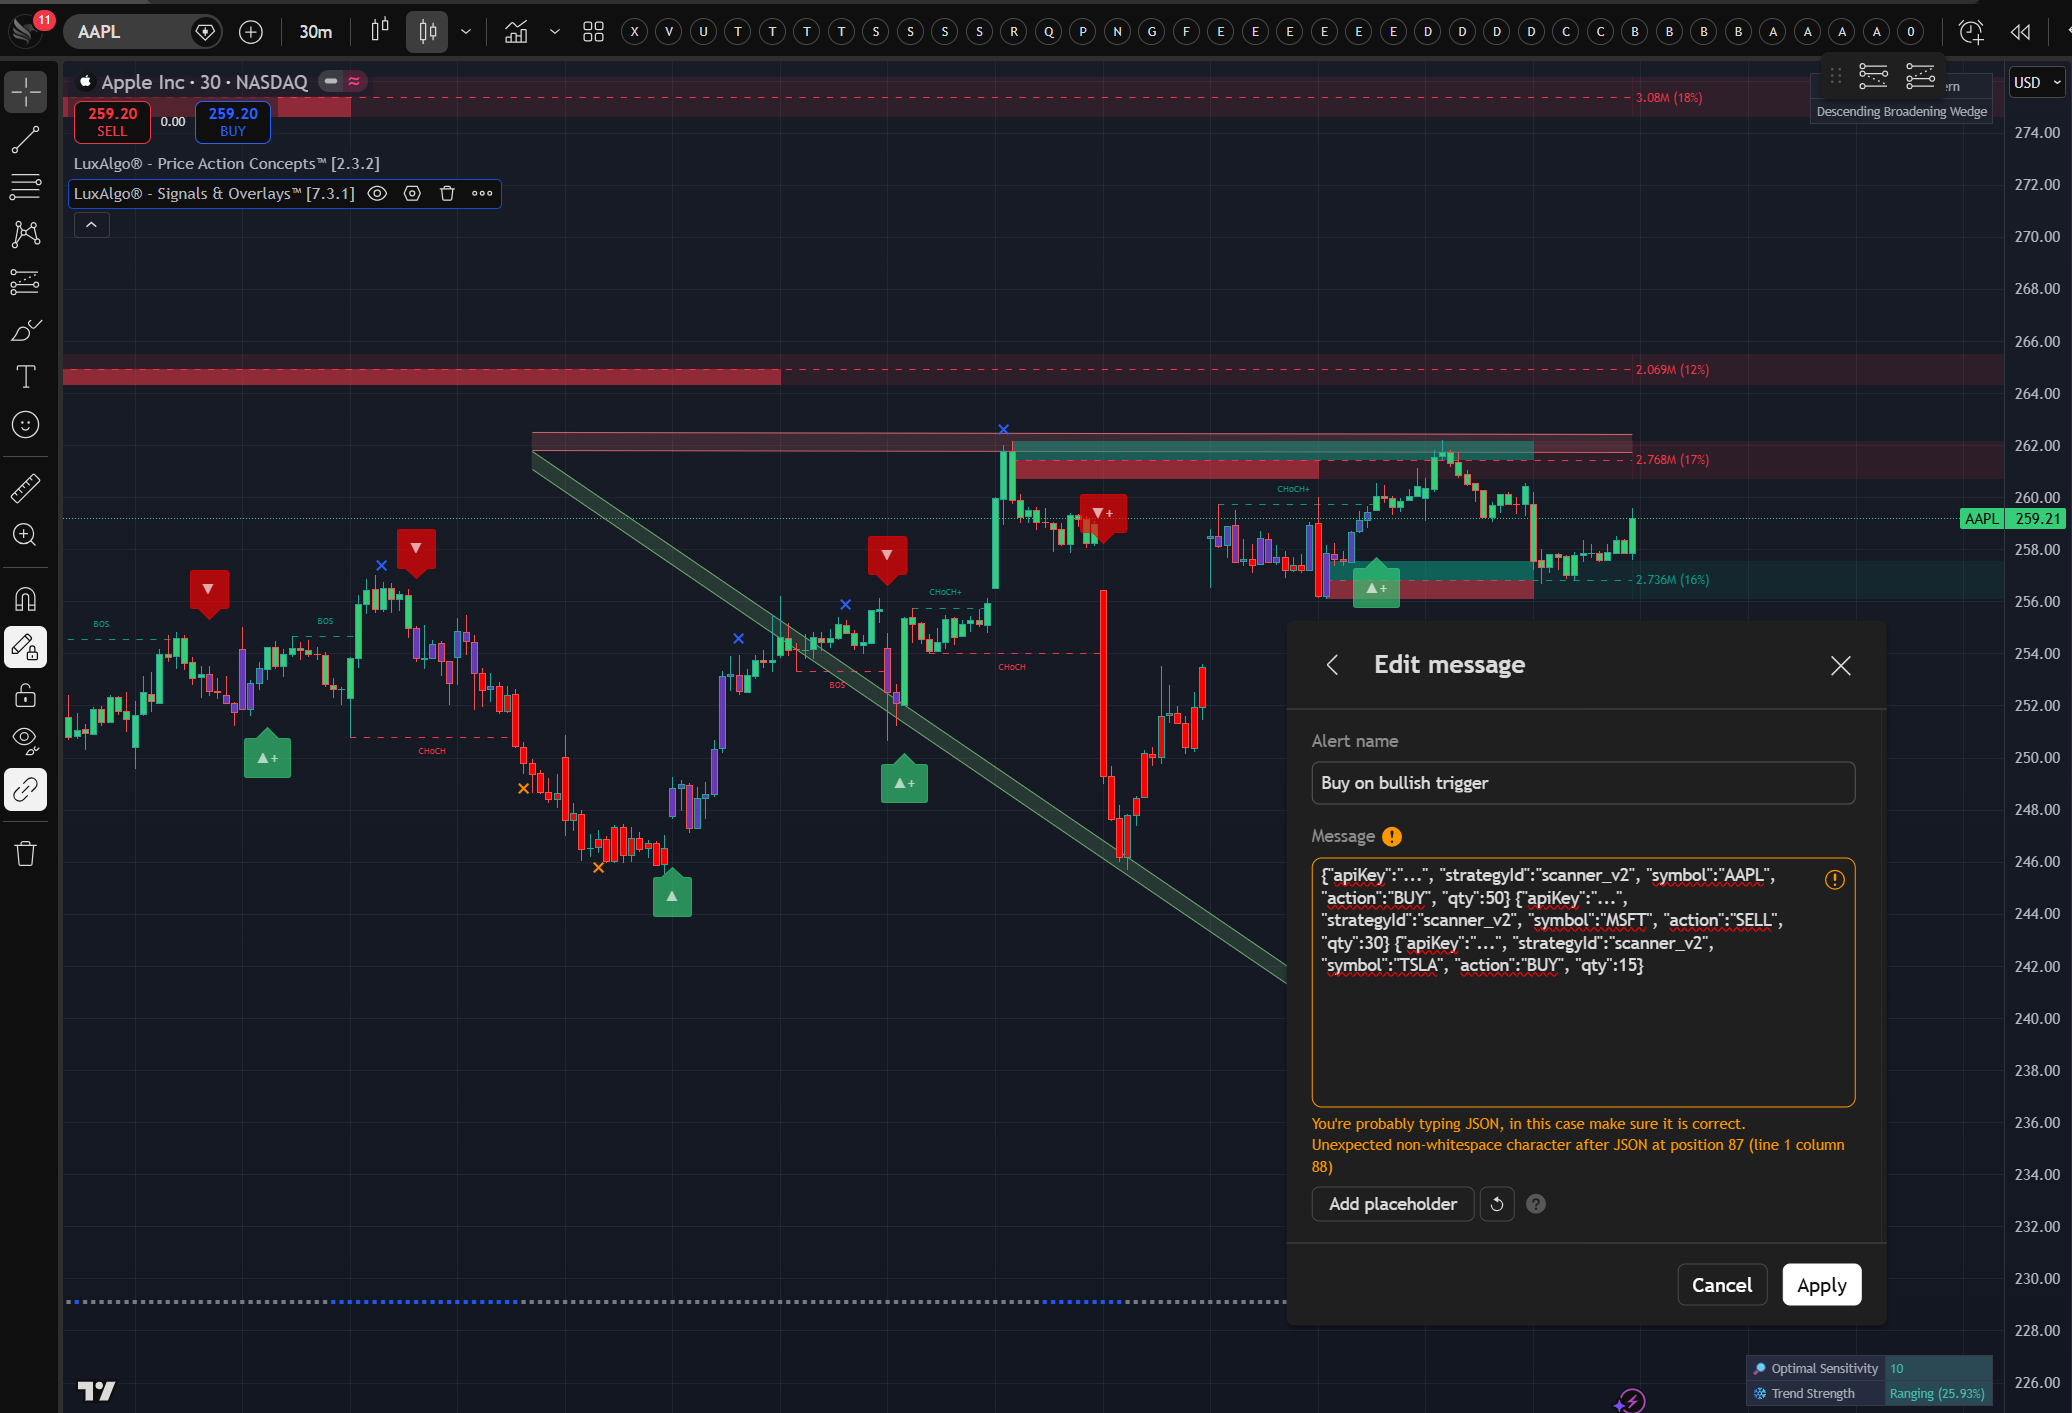
Enable Dynamic Symbol and Dynamic Action on a single algorithm. TradingView sends signals like:
{"apiKey":"...", "strategyId":"scanner_v2", "symbol":"AAPL", "action":"BUY", "qty":50}
{"apiKey":"...", "strategyId":"scanner_v2", "symbol":"MSFT", "action":"SELL", "qty":30}
{"apiKey":"...", "strategyId":"scanner_v2", "symbol":"TSLA", "action":"BUY", "qty":15}
All three signals route through one algorithm, one set of risk controls, one broker account. This is the most efficient architecture for scanner-based strategies that generate signals across a universe of tickers.
Volatility-Adjusted Position Sizing from Pine Script
Calculate position size inside Pine Script using ATR (Average True Range) or any other volatility metric, then pass the result to OntologyTrader via the qty field with Dynamic Quantity enabled:
// Pine Script: ATR-based position sizing
atrVal = ta.atr(14)
riskPerTrade = strategy.equity * 0.02  // 2% risk per trade
qty = math.floor(riskPerTrade / (atrVal * 2))

alert('{"apiKey":"YOUR_KEY", "strategyId":"atr_sized", "symbol":"' + syminfo.ticker + '", "action":"BUY", "qty":' + str.tostring(qty) + '}', alert.freq_once_per_bar_close)
This gives you dynamic, volatility-aware sizing calculated in Pine Script and executed through OntologyTrader’s execution algorithms—combining TradingView’s analytical capability with institutional-grade order handling.
Troubleshooting: The Three Issues That Account for 90% of Setup Problems
“Signal received but no algorithm matched”
This appears in the Signal Log when OntologyTrader receives the webhook but cannot route it. The cause is almost always a strategyId mismatch—the string in your TradingView alert message does not exactly match the Entry Signal ID on any running algorithm. Check case sensitivity (e.g., "RSI_oversold" is not the same as "rsi_oversold"). Also verify the algorithm is in a Started state, not stopped.
“Invalid API Key” error
The API key in your TradingView alert JSON does not match the key on your OntologyTrader account. Re-copy the key from Settings > Signal Connections—the most common cause is a trailing space or line break that got included during copy-paste. If you recently regenerated your key, update every active TradingView alert that references the old key.
Signal appears in log but no order is placed
Four possible causes, in order of likelihood:
- Algorithm is stopped. Go to the Algorithms page and click Start.
- Risk limits exceeded. The algorithm’s Max Position limit has been reached and it won’t add more exposure. Check Account Risk settings.
- Invalid symbol format. Verify the symbol string matches your broker’s format (e.g., Interactive Brokers uses
"AAPL" for US equities but "EUR.USD" for forex).
- Insufficient buying power. Your broker account doesn’t have enough margin or cash to fill the order. Check your account balance directly in your broker’s interface.
When TradingView Webhook Automation Is Not the Right Architecture
The OntologyTrader integration is designed for traders running strategies on 15-minute timeframes and above. It is the wrong solution in a few specific scenarios worth naming directly:
Sub-minute scalping: TradingView’s webhook delivery queue can add 25–45 seconds of latency during high-volatility periods. For strategies targeting 0.1–0.3% per trade on 1-minute bars, this delay eliminates the edge entirely. Direct co-located API access is the correct architecture for that speed tier.
Strategies requiring order book data: Pine Script has access to OHLCV and volume—not Level 2 quotes, depth of market, or time-and-sales. If your strategy logic depends on bid/ask spread or order flow, TradingView cannot generate the signals you need regardless of which relay platform you use.
Fully self-hosted compliance environments: If your compliance requirements mandate that all trading infrastructure runs on your own servers with no third-party relay services, a DIY webhook server (Python/FastAPI on your own cloud) is the only compliant option. OntologyTrader runs on Ontology’s cloud infrastructure, which provides enterprise audit trails and logging but does involve a third-party data path.
Frequently Asked Questions
Do I need to know Pine Script to use OntologyTrader with TradingView?
Not necessarily. If you already have a TradingView strategy or indicator that generates alerts, you only need to configure the webhook URL and JSON payload—no Pine Script editing required. For traders who want to create new strategies without coding, OntologyTrader’s AI strategy builder lets you describe entry/exit logic in plain language and generates the complete Pine Script + webhook configuration automatically.
How fast does OntologyTrader execute after receiving a TradingView webhook?
OntologyTrader’s relay processing—from webhook receipt to broker API order submission—typically completes in under 2 seconds. The larger latency component is TradingView’s own alert delivery: under normal conditions, webhooks arrive at the endpoint within 1–5 seconds of the alert trigger, but during high-volatility events the queue can extend to 25–45 seconds. Total realistic end-to-end latency for most signals is 3–10 seconds under normal conditions.
Can I run the same TradingView strategy on multiple broker accounts simultaneously?
Yes. Create multiple algorithms in OntologyTrader, each connected to a different broker account, but all using the same Entry Signal ID. When TradingView sends a signal with that strategyId, every matching algorithm fires simultaneously. This is useful for traders managing personal and client accounts, or for splitting execution across brokers for diversification.
What happens if OntologyTrader goes down while TradingView sends a signal?
If the webhook endpoint is unreachable, TradingView will report a delivery failure in its alert log. TradingView does not retry failed webhooks automatically—the signal is lost. For critical strategies, monitor your TradingView alert status dashboard and consider running a secondary alert notification (email or push) as a backup to manually intervene if the webhook fails. OntologyTrader’s uptime is monitored and runs on redundant cloud infrastructure, but no external service offers a 100% uptime guarantee.
Start Automating
The full pipeline—API key, webhook, algorithm, test signal—takes under 30 minutes for a first-time setup. If you already have a TradingView strategy generating alerts, the only new configuration is on the OntologyTrader side.